Showing posts with label PASTRY. Show all posts
Durian Cheese Pie
Mr Thorny Guy is back in season. I have stopped counting how much of those sinful but delectable creamy flesh I've eaten, not forgetting all those pengat, gulai, cake, cheesecake that were made with happiness and guilt at the same time. I even stopped buying durians but since a dear friend of mine had generously given me some and to prevent that pleasantly pungent smell from continuously wafting in the house, I just had to make something - durian pie.
The best crust for me is shortcrust. You can use a tart dough instead or a mealy pie dough (I'm not really crazy about mealy pie dough when it comes to sweet pies). If you don't have your own favourite pie crust recipe, click here. Be warned not to overwork the dough and try to find unbleached flour if possible, not the ones mostly sold in our supermarket - wau, kunci, sauh etc etc (unless if you go to the organic section).
Prepare a 9" crust pastry. Brush the sides and edges with some milk or cream and bake for 10 minutes. You can use pie weights to prevent the pastry base from forming bubbles and air pockets. For the filling:
1 stick (250g) cream cheese
1 cup granulated sugar
3 eggs
2 cups durian flesh (pureed in food processor)
1 cup cream
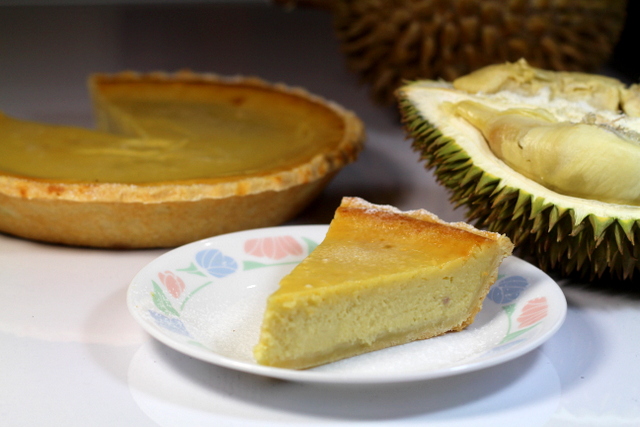
Using a flat beater, beat 250g cream cheese (room temperature) on low-medium speed for about 2 minutes. Scrape the sides every now and then so that the mixture gets evenly mixed. Gradually add 250g granulated sugar into the mixer and continue beating for 2 or 3 minutes. You should have a creamy and smooth mixture. At this point, add 3 eggs, one by one. Add durian flesh and cream. Pour mixture into the pie shell and bake for 30 minutes or until the centre is set but slightly wobbly. As it cools, it will set further. If you're chilling it, place it in an airtight container as its odor will permeate other food in the fridge.
Making a flaky croissant with perfectly structured
layers is one of the ultimate satisfaction in the art of bread and pastry
baking. The inside should stretch as it is pulled apart followed by the instant
aroma of the buttery and sweetness of this lovely pastry that fills the air
much faster than the steam that emits from between the buttery layers of the
flaky crusts.
There are many croissant recipes but I prefer this
becaue it proves faster and it calls for a fewer ingredients. The folding part
is 3 times single fold (if you’re unfamiliar with the rules of folding pastry,
you can refer to this site http://www.elclubdelpan.com/en/bread-encyclopedia/single-fold-or-tri-fold-method ). I
do however, make a book fold to my dough
just to get that extra layers. You can
always experiment with the folding part to see the result you’ll get.
Ingredients:
Flour
500g
Sugar
50g
Salt 12g
Yeast
20
Water
300g
Butter
for folding 300g OR 250g margarine
The normal procedure for making bread dough
is mixing the dry ingredients together. Then, in a mixer, put in the dry
ingredients. Add a bit of water to it. Using a dough hook, knead at medium
speed and slowly add water to it. Once all the water has been added to the
flour, increase speed and knead the dough for about 5 to 7 minutes. . Rest
dough in chiller for at least half an hour.
Take the dough out and expand it into the
best square shape possible enough to fit in the butter. The dough should be
able to wrap the butter from all sides. Make 3 simple folds but remember to
chill the dough at least half an hour in between each fold.
After folding 3 times, take out the dough
from the chiller and flatten to about 3 mm thickness. Cut into triangular
shape. Gently stretch each piece to
lengthen it. Then, on a flat surface place the wider part facing you and the
point away from you. Start shaping the croissant by rolling from the wider to the
pointed end. You can either have straight croissant or a curved one by gently
pressing the both ends together. Leave to proof for an hour and brush with egg
wash. Bake for 180C until their colour turn golden brown.
The best way to eat them is with the purest,
creamiest butter while they’re still steaming hot.
LEMON MERINGUE PIE...The Great Dessert Cookbook

Lemon meringue pie is a 19th century product (so I was told). Since then, the recipe has spread and many variations have been produced. The combination of the sourness in the pie filling and the meringue topping is simply perfect.
This pie I made was divine. Wonderful sweet, sour filling with crispy and flaky crust holding it in. But my other half would prefer it to be less sweet (so I guess, you can reduce the sugar by 1/4 cup). Lemons are quite expensive here and they are not easy to be found at the local market (in fact, there were none at the market). So I had to go the supermarket and each costed me RM1. Earlier I thought of replacing the lemons with lime but on second thoughts, I fear that that it may affect the taste. Luckily, a friend told me not to replace the juice of lemon called for in this recipe (or any other recipe) with that of a lime, because limes contain more acid than lemons, thus, they are more sour. Thank God I didnt.
Recipe:
Pastry:
2 cups plain flour 1 tbsp lemon juice
pinch salt 185g (6oz) butter
1 tbsp icing sugar 1-2 tbsp water
Sift flour, salt and icing sugar into basin; chop butter roughly, add to dry ingredients, rub in thoroughly. Add lemon juice and sufficient water to combine ingredients. Press dough to form a smooth ball, refrigerate 30 minutes. Roll dough on lightly floured surface until large enough to fit 20/23 cm (8/9 inch) pie plate. Press pastry frimly down into plate, do not strect pastry, as this could cause shrinking during baking. Trim edges from pastry, pinch frill decoratively round edge of pastry with fingers. Prick base and sides of pastry thoroughly with a fork. This will stop pastry rising during cooking.
Bake in moderately hot oven (375F/190C), or until golden brown. Set aside until cold.
Lemon Filling:
4 tbsp plain flour 90g (3 oz) butter
4 tbsp cornflour 1 tbsp grated lemon rind
3/4 cup lemon juice 1 cup sugar
4 egg yolks 1 1/4 cups water
Combine sugar and sifted flours in saucepan. Stir in combined lemon juice and water gradually; add lemon rind. Place over medium heat, stir constantly until mixture boils and thickens. It is important that the mixture boils. Reduce heat, stir for further 2 minutes. Remove from heat, add butter and lightly-beaten egg yolks; stir, off heat, until butter is melted, set aside until cold.
Meringue:
4 egg whites pinch salt
2 tbsp water 3/4 cup castor sugar
Combine egg whites, water and salt in small basin of electric mixer, beat on high speed until soft peaks form; gradually add sugar, beat until sugar is dissolved.
Assembling pie:
Spread cold lemon filling into cold pastry case, top with meringue. Spread meringue to edge of pastry case to form a complete seal. Bake in moderate oven 5 to 10 minues, or until lightly browned. Cool; refrigerate for one hour before serving.
Note: 1 hour in the refrigerator is sufficient to set the filling firmly to ensure that it cuts well. Meringue toppings on pies do not take kindly to excess refrigeration and are inclined to 'weep' if left too long in the refrigerator.
Note: Before cutting the pie, dip the knife blade into hot water, or run it under the hot-water tap. This will ensure that the meringue cuts perfectly without pulling or clinging to the knife.
CHOUX PASTRY - THE GREAT DESSERT COOKBOOK

I got this book from ebay, for less than $5. Published in 1974, edited by Ellen Sinclair. Not much can be read about this person, but she is the editor for most of the Australian Women's Weekly cookbooks and a renowned food writer in her times.
I figured that I must try the Choux Pastry coz it seemed simple. So I did. And the result?


Lovely golden brown babies puffing up in the oven...and below...just before serving..
The instructions were pretty easy and accurate. My cream puffs and eclairs were a hit at the table. And the good thing was, I could store the little puffs in an air-tight container, to be filled with cream the following day (only for the eclairs because they have been baked dry and crispy). Excellent recipe, but for the filling, I did not use cream. I made a simple pastry cream that can be chilled for a few days.
Any first-timer in making choux pastry will surely not be disappointed.
CHOUX PASTRY
1 cup water 60g butter 1 cup plain flour 3 eggs (large) pinch salt
Instructions:
Sift flour (I didn't coz I used cake flour). Put water, butter and salt in saucepan. Bring to boil, stirring until all butter has melted. Add flour all at once. Stir vigorously with wooden spoon until mixture is thick. When mixture leaves sides of saucepan and forms a smooth ball, remove pan from heat; cool. Add whole eggs one at a time. Beat in first egg at low speed then add another egg. Proceed in the same way until the three eggs have been beaten in. When using electric mixer, it may be necessary to beat in an extra egg yolk (I didn't). Don't over-beat; if mixture climbs up on beaters, turn off mixer, scrape down, beat again.
For cream puffs: Preheat oven to hot (in this book, hot = 400-450F or 200-230C). I set my oven at 220C. Pipe into rounds on trays (lined with parchment paper). Allow 2 inches space in between. Bake for 10 minutes. reduce heat to moderate (380F or 180C), and bake further 20 minutes or until puffs are golden and feel light in the hand).
Split puffs and scoop any uncooked mixture from inside (I didnt as there wasn't much mixture in each). Cool. Fill with cream. Drizzle with melted chocolate.
For the elcairs: Pipe using plain tube (1/2 in.). Bake in hot oven for 10 minutes, then reduce to 160C and bake for another 45 minutes. The eclairs will be crispy throughout. Cool and fill with cream. I also use fresh strawberries and peaches in between. Pour melted chocolate on top of each eclair.
Definitely easy and delicious.
Subscribe to:
Posts (Atom)

